Recently I did a
one-page story where the world was black and white but the people were in color. I thought I'd share how I did it.
I suggest you choose your characters carefully. I made the mistake of using a hairstyle for my female that had tendrils of hair hanging down the sides of her face. Looked nice, but made the Photoshoping a real challenge. For this tutorial, I'm using Terre from the above mentioned story.
Select Brush Tool A and Mask Mode. Make sure your brush has a hard edge, 100% Hardness. To make my life easy, I use an overlay Opacity of 63% and I like red so that's the color I use. Any color’s fine. :)
Try to stay within the area where you want to keep the color; but if you slip, don’t worry, we’ll erase that later. Blowing up the area with the magnifying glass is very helpful.
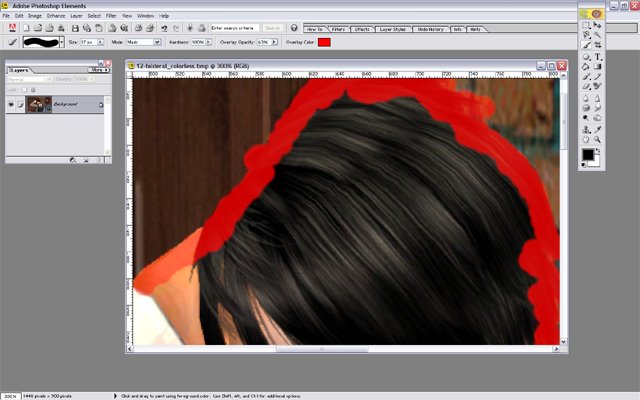
I find it easiest to carefully outline what I want to mask off with a small brush and then go back and paint in the middle with as large a brush as possible. Oh, and remember to lift your finger off your mouse every now and then so if you make a mistake you don’t have to undo a very large portion of the masking you just put in. Also, being careful as possible makes it easier. You can erase, but that's just a waste of time. For once in your life, staying inside the lines is a good thing.
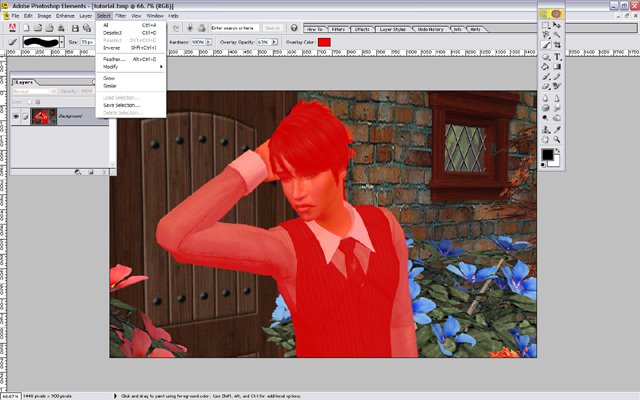
Once your selection is filled in, choose Select, Inverse.
Now the background is masked and Terre, in my case, is not.
Choose Layer, New, Layer via Copy.
You’ll notice your Layer pallet has two layers, one of just Terre and the background layer with everything. Make sure your background layer is selected and choose Enhance, Adjust Color, Remove Color.
There, the background is black and white and Terre is still in color.
You’ll notice in my example that around his hair brown from the bricks is still showing. Make sure you have the layer with your color selected.
Using the erase tool at 100% opacity, start carefully erasing anywhere you may have slipped or gone over the line with the mask brush, Terre should be the only color showing.
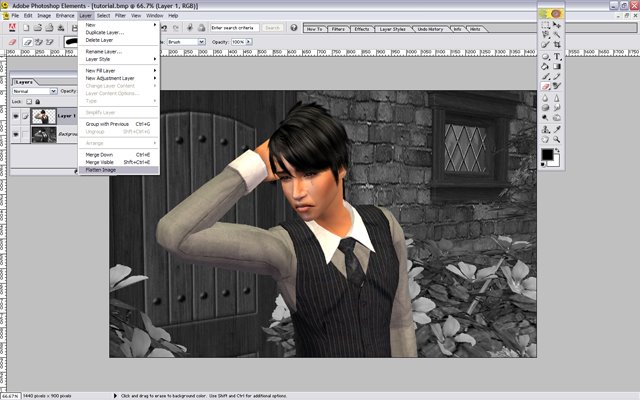
Since Terre has black hair, I don’t have to be careful erasing and because I made a layer using a copy, the black and white version of Terre is still behind him, so I won’t really erase his hair at all, I’ll just reveal what’s underneath. I had to be much more careful with Soleil, but I didn’t want to get that complicated with this tutorial. Not only was Terre’s hair forgiving, but so was his clothing. (I'm just showing the two layers below, you don't want to move the top layer off the background. If you do accidently slide the color layer over, undo and it'll snap back in place.)
Last step go to Layer, Flatten Image.
Now save however you normally do.
(Just a note, as I use Photoshop Elements 2, my layer pallet doesn't give me the option to create a mask layer, and I'm not even sure how that works. But if you can make a mask that way, then it might be easier than coloring the mask in. The rest of the steps would still remain the same.)
Hope this helps take some of the mystery out of selectively using color.
Lachesis
 I find it easiest to carefully outline what I want to mask off with a small brush and then go back and paint in the middle with as large a brush as possible. Oh, and remember to lift your finger off your mouse every now and then so if you make a mistake you don’t have to undo a very large portion of the masking you just put in. Also, being careful as possible makes it easier. You can erase, but that's just a waste of time. For once in your life, staying inside the lines is a good thing.
 Once your selection is filled in, choose Select, Inverse.
 OoT updated with Chapter Twenty-Four.
 (which is completely written - so not to worry) and my newest project which I'm looking forward to, but will keep a secret for just a little while longer, getting AC written completely and then updated will take sometime.